

Crawl errors in SEO are issues that prevent search engine bots from accessing and indexing web pages. Crawl errors occur when search engines, such as Google, encounter issues while attempting to crawl your website. Crawl errors hurt your search engine optimization (SEO) performance. They block important pages from appearing in search results.
Fixing crawl errors is one of the most important tasks in technical SEO because it directly impacts ranking potential and site visibility. Best practices for crawl health involve running crawl audits, fixing broken links, consolidating redirects, updating XML sitemaps, and using tools like Search Atlas OTTO SEO for automation. A consistent crawl error management strategy improves site health, crawl depth, and search performance.
What Are Crawl Errors in SEO?
Crawl errors in SEO are access or retrieval failures that prevent search engine bots (crawlers) from reaching, crawling, or indexing your web pages. Crawlers follow links from page to page across the internet. They analyze content and add it to search indexes. Crawl errors interrupt the crawling process. They prevent crawlers from reaching your pages or understanding your content structure.
Crawl errors disrupt the crawling process by returning invalid responses like DNS failures, server errors, 404 not found pages, or redirect loops. Google Search Console flags crawl errors when bots cannot access or interpret a URL correctly. Crawl errors affect page discoverability, reduce index coverage, and waste crawl budget, especially when they recur across critical parts of a site.
Search engines group crawl errors into site-level crawl errors and URL-level crawl errors.
- Site-level crawl errors occur when the crawler cannot reach the domain (e.g., DNS failures or server timeouts).
- URL-level crawl errors happen when specific resources like pages, images, or scripts are blocked, broken, or misconfigured.
What Does a Crawl Error Look Like?
The most common crawl error examples are below.
HTTP/1.1 404 Not Found
HTTP/1.1 503 Service Unavailable
<meta name="robots" content="noindex, nofollow">
Disallow: /checkout/
<link rel="canonical" href="https://example.com/page-a"> <!-- on page-b -->
Each crawl error either blocks discovery, delays indexing or causes duplicate or conflicting signals. Crawl diagnostics require matching status codes, directives, and canonical tags to the actual page intent.
What Types of Crawl Errors Exist?
There are 6 main types of crawl errors. The types of crawl errors include DNS issues, server errors, robots.txt blocks, not found (404) errors, soft 404s, and redirect loops.
- DNS failures. Googlebot cannot resolve the IP address of your domain.
- Server errors (5xx). The web server returns 500, 502, 503, or 504 errors.
- Robots.txt restrictions. Disallowed folders prevent access to important assets or templates.
- 404 not found. Page no longer exists, URL is broken, or deleted without a redirect.
- Soft 404. The page loads with a 200 status but has no content or displays an error message.
- Redirect chains or loops. Multiple chained 301s or infinite loops delay crawling.
Crawl errors affect every type of page, such as home, product, category, article, media, and sitemap entries. Google Search Console flags these under Index > Pages > Why pages aren’t indexed.
How Do Crawl Errors Impact SEO?
Crawl errors negatively impact SEO by blocking indexation, wasting crawl budget, and breaking internal link equity. Search engines fail to discover or refresh content when crawl errors exist. These failures reduce visibility, traffic, and ranking stability.
Crawl errors reduce index coverage. When Googlebot encounters broken pages, it skips them and may remove them from the index. This leads to fewer indexed URLs, weaker topical authority, and lower keyword presence across the site.
Crawl errors disrupt internal linking. Broken links stop PageRank flow, which weakens authority signals passed between pages. Redirect loops and invalid anchor paths confuse crawlers and lower trust in the site structure.
Crawl errors waste the crawl budget. Google allocates a fixed number of crawl requests per site based on performance, authority, and health. Redirect chains, blocked assets, or unreachable pages consume that budget and prevent important URLs from being crawled or refreshed.
Crawl error frequency influences crawl stats and crawl scheduling. High error rates signal instability. Search engines deprioritize sites with persistent crawl failures, which delay content updates and degrade SERP performance.
Pages with crawl errors lose ranking power. The entire website structure becomes less effective for SEO purposes.
What Causes Crawl Errors?
Crawl errors result from hosting issues, misconfigured redirects, broken internal links, outdated sitemaps, or improperly scoped robots.txt files.
- Hosting issues trigger downtime, server errors, or timeouts.
- Misconfigured redirects loop endlessly or use temporary status codes (302) where permanent ones (301) are required.
- Broken internal links reference deleted or renamed URLs.
- Outdated sitemaps list non-indexable pages or legacy paths.
- Robots.txt files block crawlable resources like CSS, JS, or important subdirectories.
Crawl barriers reduce site coverage, slow page discovery, and lower technical SEO scores.
How to Find Crawl Errors?
You find crawl errors using Google Search Console (GSC) or technical site audits. These methods reveal crawl failure patterns and support ongoing monitoring.
The 2 best methods to find crawl errors are below.
1. Use Google Search Console
Google Search Console provides the most authoritative crawl error data. Google reports exactly which pages it cannot crawl. The Coverage report shows the indexing status for all discovered URLs. GSC identifies specific error types and affected page counts.
To check for crawl errors using Google Search Console, open the Index section and navigate to the Pages report to view crawl-related issues. Focus on sections labeled “Not Indexed” with reasons like blocked by robots.txt, soft 404, redirect error, or server error (5xx).
Use the URL Inspection Tool to test specific URLs and view crawlability, indexing status, and active robots/meta directives.
Use the Crawl Stats report in Google Search Console to see how often Googlebot visits your site, which URLs it requests, and whether those requests succeed. The Crawl Stats report helps you detect crawl bottlenecks, server issues, and wasted crawl budget.
The Crawl Stats report includes the elements below.
- Total crawl requests. The number of URLs Googlebot attempted to fetch.
- Total download size. The volume of data downloaded.
- Average response time. The average speed of the server during crawling.
- Crawl response codes. A breakdown of status codes (200, 404, 5xx, etc.).
- File types crawled. HTML, CSS, images, JavaScript, etc.
- Crawl purpose. Whether the request was for discovery or refresh.
- Googlebot types. Desktop, smartphone, AdsBot, etc.
- Host status. Your server’s health, including DNS and robots.txt availability.
Use the Crawl Stats report if your website has over 1,000 pages, you’ve noticed indexation delays or crawl errors, you recently changed robots.txt, DNS, or hosting infrastructure, or you want to diagnose why crawl rates spiked or dropped.
The Crawl Stats report feature only works on domain-level or root-level URL prefix properties (e.g., https://example.com).
2. Run a Site Audit with Search Atlas
Search Atlas includes a dedicated Site Audit Tool that simulates how search engines crawl and process your website. The Search Atlas Site Audit Tool identifies crawlability issues like broken links, 3XX chains, blocked resources, and content rendered via JavaScript.
To start a crawl, follow the steps below.
- Enter your domain and configure crawl depth (recommended crawl depth is the number of total pages plus 10%).
- Set crawl frequency (weekly crawl for dynamic content, monthly crawl for static sites).
- Choose the crawler user agent (Googlebot Mobile is recommended).
- Adjust speed and rendering options.
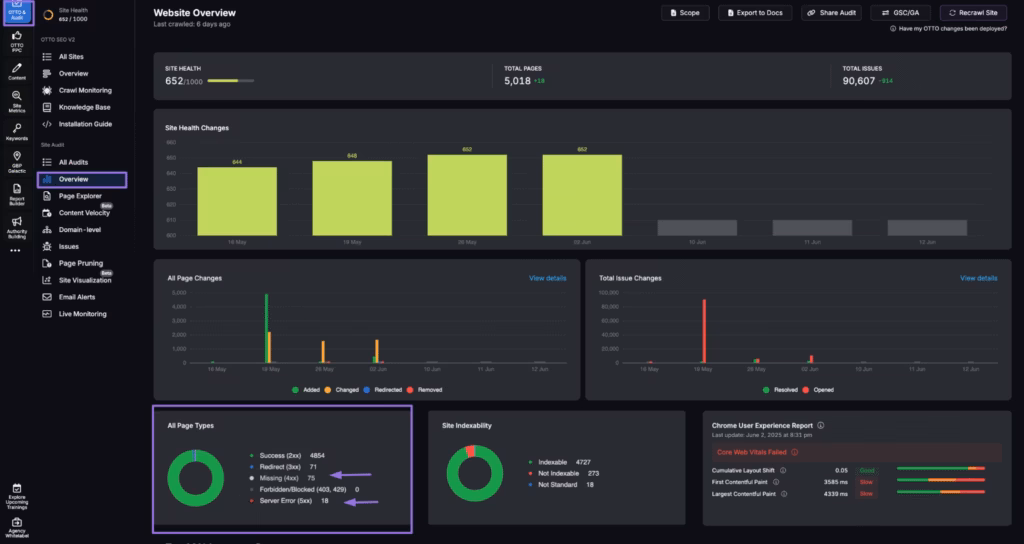
The Overview section within the Search Atlas Site Audit Tool will show you all page-type crawl errors within your website.
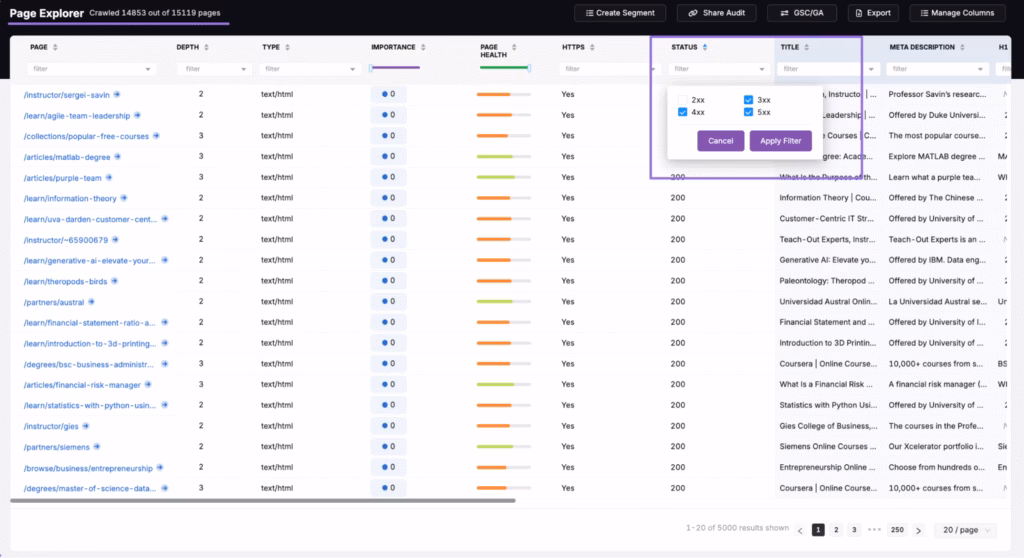
Navigate to the Page Explorer section of the Search Atlas Site Auditor to find the exact links that are causing crawl errors within your site and fix them immediately.
Use the “Crawl Monitoring” dashboard to track how bots interact with your pages over time. The Crawl Monitoring dashboard is connected to the OTTO SEO agent and allows you to view crawl activity across Google, Bing, GPTBot, ClaudeBot, and other search engines or AI bots.
Monitor which pages get visited, how often, and which bots prioritize which sections, and spot crawl rate anomalies, status code spikes, or signs of crawl budget misallocation.
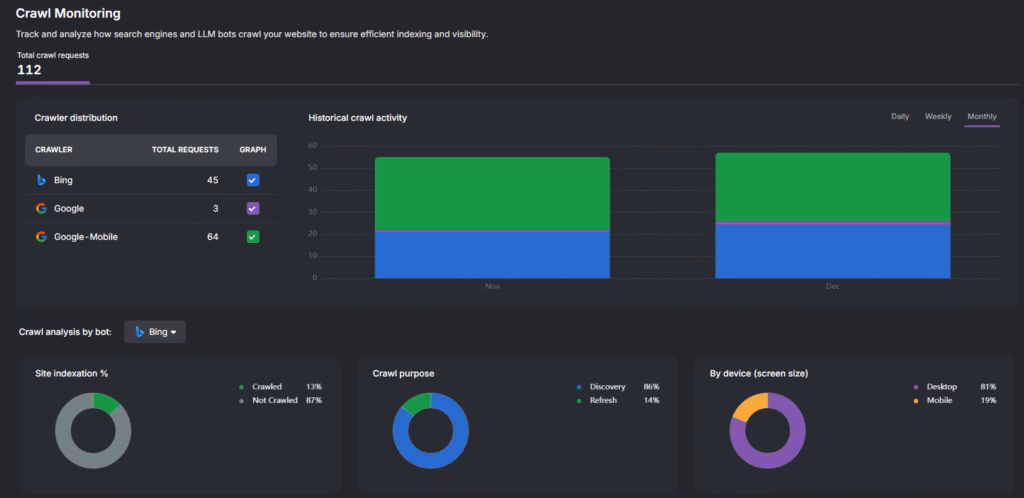
Search Atlas is the first SEO platform to track multi-bot crawl activity in one unified view. You gain a clear competitive edge by understanding exactly how human and AI bots process your site.
How to Fix Crawl Errors?
Fix crawl errors by replacing broken links, collapsing redirect chains, correcting crawl directives, and submitting clean sitemaps for re-indexing. Use both Google Search Console and Search Atlas tools to apply and validate crawl error fixes.
The 9 steps to fix crawl errors are below.
- Open Google Search Console. Navigate to Index > Pages and filter by “Not Indexed.”
- Run a crawl audit. Use the Search Atlas Site Auditor to generate a full site crawl, flagging 404s, 5xxs, and disallowed resources.
- Fix broken internal links. Replace dead links with valid URLs or remove them completely.
- Update redirects. Collapse redirect chains into a single 301 and eliminate loops.
- Clean your sitemap. Use Search Atlas Page Explorer to remove 404s and verify each URL returns a 200 status.
- Review meta robots tags. Ensure public pages use “index, follow” and no conflicting “noindex” exists.
- Verify robots.txt. Open “https://yourdomain.com/robots.txt” and confirm crawlable sections are not disallowed.
- Submit the sitemap. Resubmit a clean sitemap to Google Search Console.
- Reinspect fixed URLs. Use GSC’s URL Inspection Tool to request reindexing after fixes.
Fix propagation takes 2 to 14 days, depending on crawl frequency.
How to Fix Crawl Errors Automatically with OTTO SEO?
Search Atlas OTTO SEO automates crawl error resolution by detecting, prioritizing, and correcting issues that prevent indexing or efficient crawling. OTTO SEO fixes broken links, redirect chains, and crawl-blocking directives in real-time.
OTTO SEO applies five automated corrections to common crawl issues. Each fix updates live without CMS access or developer support.
- Replace broken internal links. OTTO SEO detects deleted or outdated internal links and replaces them with valid final destination URLs that return a 200 status.
- Remove redirect chains. The system identifies multi-step redirection paths and collapses them into a single direct link to the canonical target.
- Correct meta robot conflicts. OTTO SEO finds and flags crawlable URLs that include conflicting noindex or nofollow directives and corrects them to use index, follow.
- Fix canonical mismatches. OTTO SEO updates pages with inconsistent or incorrect canonical declarations to reflect accurate source-target relationships.
- Trigger indexing. OTTO SEO submits fixed or newly generated URLs to Google using its Dynamic Indexing system after resolving crawl errors.

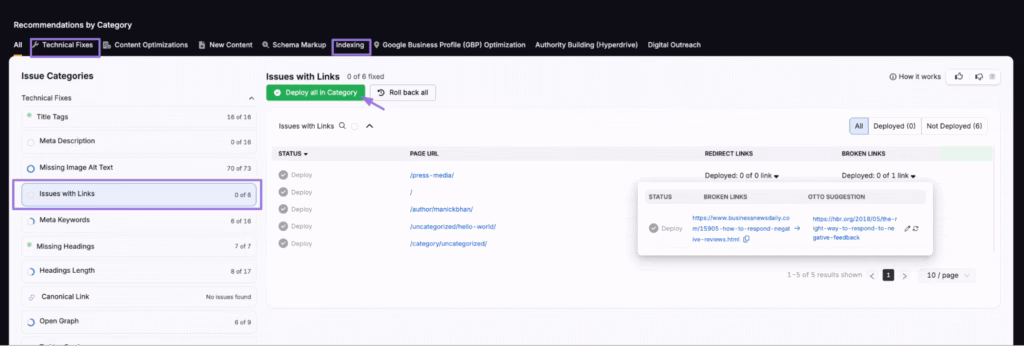
OTTO SEO “Issues With Links” and “Indexing” modules allow one-click deployment. Search Atlas OTTO SEO fixes apply instantly without developer assistance. All corrections sync with audit logs.
What Are the Best Practices for Crawl Health?
The best practices for crawl health help search engines navigate your site, avoid crawl traps, and prioritize indexable content. The list below includes the crawl health best practices that improve crawlability and indexability, reduce error rates, and support ranking performance.
The 9 best practices for crawl health are below.
1. Use 301 Redirects Instead of 302
Using 301 redirects instead of 302 helps preserve ranking signals and improves crawl efficiency, especially during site migrations or URL restructuring. Permanent redirects (301) pass full link equity and signal to search engines that the destination URL has replaced the original. Avoid using 302 redirects unless the destination is temporary. Tools like the Search Atlas Site Auditor can detect redirect types and flag misconfigured links during audits.
2. Keep Your Sitemap Clean and Accurate
Your XML sitemap should only include live, indexable pages that return a 200 status code. Remove all 404s, redirects, noindexed pages, and disallowed URLs to prevent search engines from wasting the crawl budget.
Validate your sitemap using Google Search Console’s sitemap submission tool or the Search Atlas Site Auditor (Issues section) to confirm proper formatting and coverage.
3. Avoid Redirect Chains in Internal Links
Every internal link should go directly to the target page without passing through intermediate redirects. Redirect chains dilute link equity, delay crawler access, and may lead to incomplete indexing. The OTTO SEO “Issues with Links” module inside Search Atlas scans your site for chains and loops, then suggests one-click fixes to point each internal link to its final URL.
4. Validate Your Robots.txt File
Syntax issues or aggressive disallow rules in your robots.txt file can unintentionally block pages that need to be crawled and indexed. Test your robots.txt file using Google’s Robots.txt Tester and verify that only irrelevant or sensitive sections (like admin or login pages) are disallowed. You can view the crawl status by page in the Search Atlas Crawl Monitoring dashboard for deeper analysis.
5. Avoid Excessive Disallow Rules
Use Disallow directives only for non-public pages that should never appear in search results. Overblocking common paths or entire directories may cut off important navigation flows from crawler access. Review crawl paths and disallow directives using the Search Atlas crawl configuration, and refine exclusions to reduce friction for bot navigation without overexposure.
6. Enable Self-Referencing Canonical Tags
Every indexable page should include a canonical tag that points to its own URL unless a specific canonical version exists. Self-referencing canonical tags helps consolidate link signals and clarify indexing decisions. Missing or incorrect canonical tags can lead to duplicate content issues.
7. Use Absolute URLs in Canonicals and Sitemaps
Always use absolute URLs with the full protocol and domain in canonical tags and XML sitemaps. Relative URLs can be misinterpreted by search engines, leading to indexing inconsistencies. For example, use https://yourdomain.com/page instead of /page. Confirm correct usage through sitemap validation tools, which show canonical paths and sitemap inclusion side by side.
8. Run Weekly Site Audits
Running regular site SEO audits help detect crawl issues early and maintains optimal technical SEO health. Use the Search Atlas Site Audit Tool to scan for 404s, broken links, redirect chains, and meta tag conflicts. Schedule weekly SEO audits for dynamic or content-heavy websites to catch new errors quickly and reduce the time between error emergence and resolution.
9. Monitor Crawl Stats in Google Search Console
Google Search Console’s Crawl Stats report provides insights into how often Googlebot visits your site, how many URLs it crawls per day, and how long it takes to fetch each page. Watch for spikes in crawl errors, sudden drops in activity, or elevated fetch times that may signal deeper issues. Pair these reports with Search Atlas Crawl Monitoring to cross-reference bot behavior across Google, Bing, and AI crawlers like GPTBot and ClaudeBot.
What to Know About Crawl Errors Besides Technical SEO?
Crawl errors reduce technical SEO performance by blocking discovery, delaying indexing, and misusing crawl resources.
Technical SEO depends on crawlability, indexation, and site accessibility. Crawl errors break that flow. Google prioritizes sites that load fast, stay secure, and serve content without structural friction. Frequent crawl errors (e.g., 404s, 5xx, blocked JS) signal low-quality site health.
Crawl error prevention is one of the most important segments of technical SEO. This optimization pillar improves site performance, strengthens architecture, and enhances search engine trust.
What Is the Difference Between Crawl Errors and Indexing Errors?
Crawl errors prevent page discovery. Indexing errors occur after discovery, blocking search result inclusion.
A crawl error example would be that robots.txt blocks /blog/, therefore, pages are not crawled. An indexing error example would be that the page is crawlable but marked noindex in the meta robots.
You need to fix the crawl barriers first. Then address indexing directives and content quality signals.
How Does the Crawl Budget Relate to Crawl Errors?
The crawl budget defines how many pages search engines will crawl. Crawl errors waste that crawl budget.
Every broken link, redirect chain, or disallowed path consumes crawl budget allocation. If 70% of crawl attempts fail, then critical pages never get discovered or refreshed. Improving crawl efficiency directly increases index coverage, freshness, and SERP visibility.


