

The 12-step WordPress SEO checklist covers essential optimization tasks from hosting selection through content creation. Key steps include choosing managed WordPress hosting with security features, registering domains through authorized registrars, installing WordPress manually or via tools, implementing CDN services for global content delivery and acquiring SSL certificates.
Then, you move on to selecting appropriate themes (block, classic, or hybrid), customizing designs through Site Editor or page builders, installing Search Atlas plugin for comprehensive SEO automation, activating OTTO SEO for AI-powered optimization tasks, organizing content with strategic categories and tags, configuring SEO-friendly permalink structures, and creating optimized content.
1. Select a hosting provider
WordPress runs on any web hosting service. However, WordPress hosting services boost your website's performance and security because providers design them specifically for this CMS.
Choose managed WordPress hosting if you plan to use this platform. Most providers handle WordPress-related updates and technical adjustments for you. Look for a WordPress host that provides expert customer support as well.
This web hosting service includes pre-installed plugins and themes that speed up your website-building process. Pay attention to the factors listed below.
- Storage and Bandwidth. Your provider must give you enough server resources to store all your website files. Unmetered bandwidth guarantees that your website handles high traffic volumes.
- Speed and Optimization. Underperforming servers slow your site's loading time and hurt its SEO and user experience. Find hosting services with optimized resources.
- Security. Check that your provider offers DDoS protection, encryption methods, and malware detection. Automatic backup services and updates are essential features to prioritize.
2. Register your domain name
Your domain name serves as your website's address on the internet. Your hosting account stores your actual website files and content. You need both components to run a WordPress website.
WordPress connects to your hosting account during installation. The system creates a database and uploads WordPress files to your server space during this process.
WordPress.org provides a list of hosting providers where you purchase both domain names and hosting accounts. Verify that your hosting company supports WordPress before you make a purchase.
Choose a Domain Name Registrar
Domain name registrars are companies that the Internet Corporation for Assigned Names and Numbers (ICANN) authorizes to register domain names. The factors to consider when you select a registrar are listed below.
- Popular options include GoDaddy, Namecheap, Cloudflare, and Porkbun
- Compare prices across different registrars to find the best value
- Evaluate customer support quality and availability
- Test the platform's ease of use and interface design
Search for Domain Availability
Use your registrar's website to search for your desired domain name. Try different extensions like .com, .net, or .org if your preferred name is unavailable. You also test variations of your original name. Many registrars offer tools which help you find available names based on keywords or suggestions.
Select and Purchase the Domain
Add your available domain to your cart after you find one you like. Choose your registration period, which typically ranges from one to ten years. Review your registration details and any additional services, such as domain privacy. Complete your purchase by providing contact information and payment details.
Verify Your Information
You often need to verify your contact information through email or other methods after registration. This verification ensures accuracy and protects against fraud.
Manage Your Domain
Access your registrar's control panel to manage your domain after registration. You update contact information, manage DNS settings, and renew your registration through this panel.
3. Install WordPress
Tools like LocalWP, DevKinsta, and VVV automatically create a new local site and install WordPress for you. Check the documentation for your chosen tool if you use one of these options. For manual WordPress installation, follow the steps outlined below.
Download and Prepare WordPress Files
Download and unzip the WordPress package if you haven't already done so. Save the files to a location where you can access them easily.
Create a Database
Create a database for WordPress on your web server. You also need to create a MySQL or MariaDB user who has all privileges for accessing and modifying the database.
Configure WordPress Settings (Optional)
Find the wp-config-sample.php file and rename it to wp-config.php. Edit this file and add your database information. You skip this step if you are not comfortable with renaming files. The install program creates the wp-config.php file for you automatically.
Upload WordPress Files
Upload the WordPress files to your desired location on your web server using a File Transfer Protocol (FTP).
The possible locations are listed below.
- Move or upload all contents of the unzipped WordPress directory into the root directory of your web server if you want to integrate WordPress into the root of your domain (https://example.com/)
- Create a subdirectory on your server and upload the WordPress package contents to that directory if you want WordPress in its own subdirectory (https://example.com/blog/)
Make sure your FTP client's option to convert file names to lowercase is disabled if your FTP client has this feature.
Run the Installation Script
Access the URL in a web browser to run the WordPress installation script. The URL where you uploaded the WordPress files looks like one of the options below.
- https://example.com/ if you installed WordPress in the root directory
- https://example.com/blog/ if you installed WordPress in a subdirectory called "blog"
WordPress is now installed and ready to use.
4. Install a CDN service
A CDN stands for Content Delivery Network. A content delivery network is a dedicated server setup which delivers your media faster and more efficiently. Your content is cached and stored on servers across the world rather than a single location when you use a CDN.
CDN spans different types of content delivery services, including video streaming, software downloads, web and mobile content acceleration, transparent caching, and services that measure CDN performance and load balancing.
A CDN reduces loading times for visitors who access your website from different geographical locations. The system serves content from the server closest to each visitor's location.
We explain how to install a CDN below.
Choose a CDN Provider
Select a WordPress CDN services provider. Popular choices include Cloudflare, Akamai, and Amazon CloudFront. You sign up for a hosting provider with a free CDN or select a separate CDN provider and subscribe to their service.
Install a CDN Plugin
Install and activate a CDN plugin on your WordPress site. Popular options are listed below.
- CDN Enabler
- W3 Total Cache
- Jetpack
- Cloudflare
Configure the Plugin
Access the CDN plugin's settings page in your WordPress dashboard. Enter the CDN URL provided by your CDN provider. Save the settings to apply the CDN configuration.
Activate the Service
The CDN plugin automatically rewrites the URLs after you save your settings. Your website now serves static content through the CDN network, which improves loading speeds for visitors worldwide.
5. Acquire an SSL certificate
SSL stands for Secure Sockets Layer. An SSL certificate encrypts data that travels between your website and your visitors' browsers. The certificate creates a secure connection and protects sensitive information like passwords, credit card numbers, and personal data.
Search engines favor websites with SSL certificates and rank them higher in search results. Browsers display security warnings to visitors when they access websites without SSL certificates. SSL certificates build trust with your visitors and protect their data from hackers. It is an essential part of HTTPS for SEO.
The best SSL type depends on your site's purpose and structure. A single-page site for a local coffee shop, which shares basic info like hours and location, needs Domain Validation and a Single Domain certificate if it doesn't collect user data.
An ecommerce site which collects personal and payment details requires greater trust and protection. Extended Validation and either a Wildcard or Multi-Domain certificate better suit sites with multiple product pages, categories, or blogs.
Install the SSL Certificate
Most hosting providers offer free SSL certificates through Let's Encrypt or provide SSL certificates as part of their hosting packages. Contact your hosting provider to request SSL installation or check your hosting control panel for SSL options.
Activate SSL in WordPress
Activate the SSL certificate immediately after installation to secure the website with HTTPS. Follow these steps for WordPress websites:
- Log into the WordPress admin dashboard
- Navigate to Settings → General
- Enter the HTTPS version of the website URL into both the WordPress Address (URL) and Site Address (URL) fields
- Click Save Changes
WordPress switches from HTTP to HTTPS automatically after you complete these steps. This happens only if the SSL certificate already exists on the hosting server. This feature applies to WordPress version 5.7 and later.
6. Choose a theme
Visit Appearance → Themes in your WordPress.com dashboard to browse the collection of available themes. These themes don't need to be uploaded or installed on your site. You activate them with the click of a button. WordPress offers themes to suit all types of websites and budgets, with new themes added regularly.
WordPress offers four types of themes which are explained below.
Block Themes
A block theme uses blocks for all parts of the site, including navigation menus, headers, content, and footers. Block themes allow you to edit and customize all parts of your site within the Site Editor.
Block themes include a Live Preview feature. Hover over the block theme to see a Live Preview button. Click on Live Preview to access the Site Editor and preview the site simultaneously. You make changes or customizations and activate the theme with your changes if you like what you see.
Classic Themes
A classic theme does not use the block editor to manage the site layout beyond posts and pages. These themes use the Customizer, Menus, and Widgets to make changes to theme settings. Classic themes have been around the longest, so there are many more options to choose from.
Navigate to Appearance and click on Themes to access classic themes. You will have access to the Customizer and more in the sidebar settings. Open the Customizer to change all your theme settings from one location. Block themes provide greater flexibility for designing and customizing your website compared to classic themes.
Hybrid Themes
A hybrid theme is a classic theme that adopts some features of site editing, like the Template Editor. A hybrid theme uses the Customizer to make changes while also allowing you to create your own custom templates.
Navigate to pages, open one of your pages, and go to the sidebar settings on the right. Click on Templates to assign a page to a different template or create a custom template.
Universal Themes
A universal theme is a theme that you configure completely either as a block theme or a classic theme.
How to Choose the Right Theme
Consider the factors below when you decide on a theme.
- Examine the header area where you typically see the site title, menu, and logo
- Review how the content is organized and presented.
- Check how the theme appears on mobile and tablet screens by opening the live demo and using the selector at the top to switch between desktop, tablet, and mobile views.
Focus on the overall layout rather than the subject matter shown in the demo when you look at themes. A theme's demo site may showcase a furniture store, music portfolio, fashion site, or food blog. You customize your site for any topic after you swap out the demo text and images for your own content.
7. Customize the theme
WordPress provides multiple ways to customize your theme after you activate it. You modify colors, fonts, layouts, and other design elements to match your brand and preferences.
Customization options are explained below.
Site Editor (Block Themes)
Navigate to Appearance → Editor to access the Site Editor if you use a block theme. The Site Editor allows you to customize all parts of your website, including headers, footers, and content areas. You change colors, typography, and spacing directly within the editor. You also create custom templates and modify existing ones.
Customizer (Classic Themes)
Navigate to Appearance → Customize to access the Customizer if you use a classic theme. The Customizer provides options to modify your theme settings, including site identity, colors, typography, and layout options. You see changes in real-time as you make adjustments.
Page Builders for Advanced Customization
WordPress page builders like Elementor, Oxygen, and Divi offer powerful tools for customizing your website's theme. These builders allow you to visually design and build various aspects of your site without needing to code.
8. Install the Search Atlas Plugin
Search Atlas Premier SEO Plugin is the most comprehensive WordPress SEO solution with AI-powered content optimization, schema markup generation, and technical SEO automation. Search Atlas Premier SEO Plugin is an all-in-one WordPress SEO plugin that includes keyword research integration, SERP preview tools, and real-time content analysis that provides actionable recommendations as you write.
The plugin identifies critical SEO issues across your website, including robots.txt problems, sitemap errors, image optimization issues, broken links, and overall website health concerns. Search Atlas scans your entire website and provides detailed reports about technical SEO problems that affect your search rankings.
We explain how to install the Search Atlas Plugin from the WordPress dashboard.
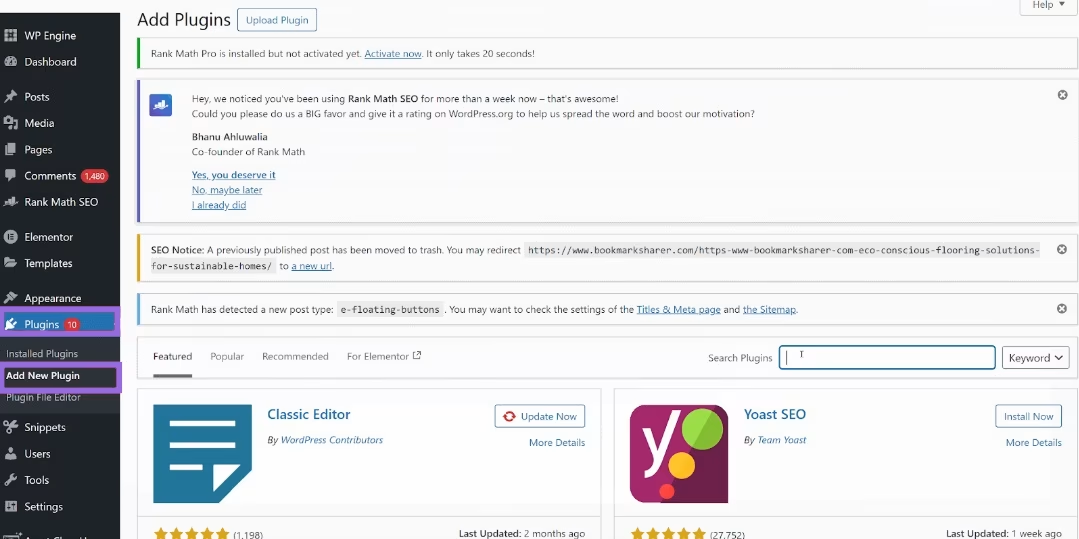
Navigate to Plugins → Add New in your WordPress dashboard. Search for "Search Atlas" in the plugin search box.
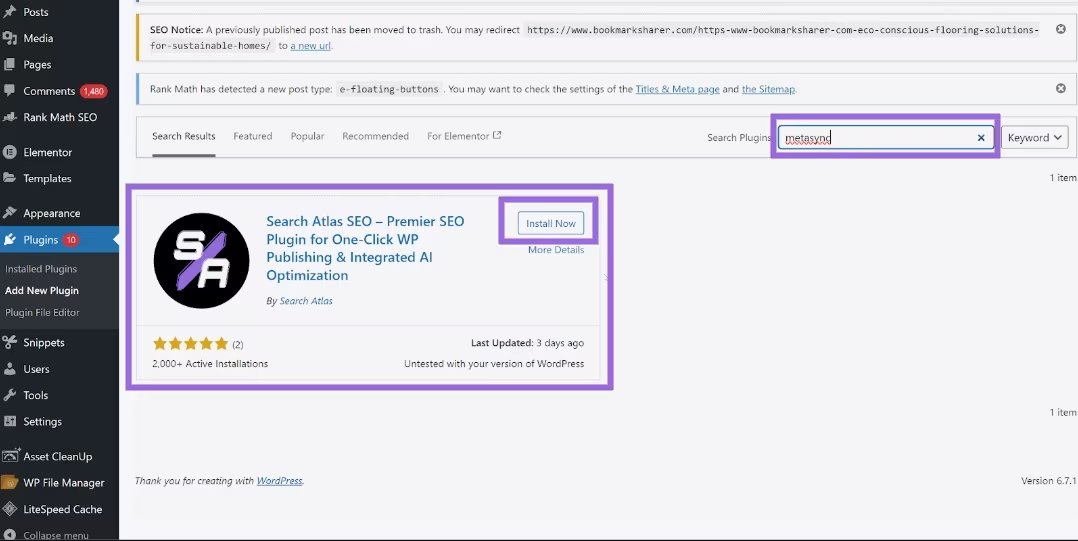
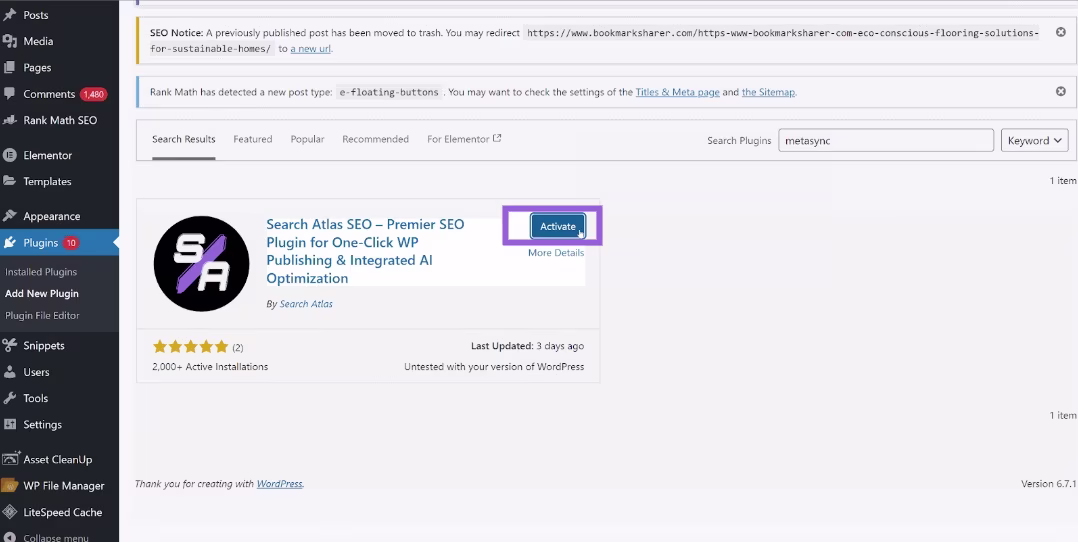
Click Install Now next to the Search Atlas Premier SEO Plugin. Click Activate after the installation completes.
Access the Search Atlas settings from your WordPress dashboard after you activate the plugin. The plugin guides you through the initial setup process. You connect your website to Search Atlas services and configure your SEO preferences.
Search Atlas automatically begins scanning your website after you complete the setup. The plugin analyzes your content, technical SEO elements, and overall website health. You receive a comprehensive report that highlights priority issues that need immediate attention maintaining your WordPress SEO health.
9. Install OTTO SEO
Search Atlas OTTO SEO is an advanced AI SEO tool for WordPress which automates optimization in seconds without requiring technical expertise. OTTO SEO ensures websites are fully crawlable, indexable, and optimized for search engines while saving you countless hours of manual work.
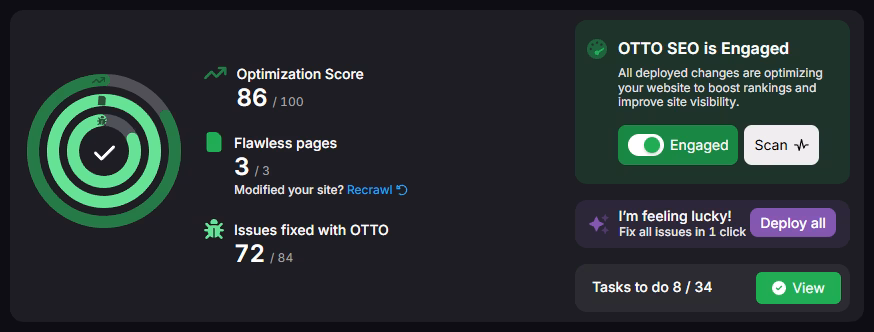
Install the Search Atlas plugin on your WordPress website. Copy your unique OTTO script from the Search Atlas dashboard. Paste the script into the plugin settings. OTTO SEO Pixel begins analyzing your site and suggesting improvements automatically after you activate it.
OTTO SEO automates most SEO efforts with one click including internal links, on-page SEO optimization, technical fixes, and content creation suggestions. Its key automation features are listed below.
- Title Tags and Meta Descriptions. Identifies issues and suggests AI-generated improvements which balance keyword optimization with click-through potential
- Link Issues. Fixes redirected internal links and replaces broken external links automatically
- Image Optimization. Adds missing alt text with optimized descriptions that include relevant keywords
- Schema Markup. Implements structured data automatically using Knowledge Graph data for LocalBusiness, Article, Product, and FAQ types
- Heading Structure. Improves content hierarchy by suggesting proper H1, H2, H3, H4 structures with target keywords
- Internal Linking. Identifies linking opportunities between related content and suggests contextual links with optimized anchor text
- Indexing and Visibility. Accelerates indexing process and reindexes low-impression pages automatically using Dynamic Indexing
10. Configure categories and tags
WordPress categories and tags are taxonomies which create content organization to improve navigation and search engine understanding. Categories represent broad topics which form the main site structure, while tags provide more specific connections between related content.
Set Up Your Category Structure
Create a deliberate category structure with 5-10 main categories. Focus on broad topics which represent your main content areas. Avoid creating too many categories as this dilutes your content organization and confuses visitors.
Plan your categories before you publish content. Choose category names which reflect your business focus and target keywords. Each category should contain multiple related posts to justify its existence.
Optimize Category Pages
Treat category pages as important landing pages by adding custom descriptions, featured content, and optimized titles which target relevant keywords. Navigate to Posts → Categories in your WordPress dashboard to edit category descriptions.
Write unique descriptions for each category which include your target keywords naturally. These descriptions help search engines understand your category content and improve your SEO rankings.
Add custom titles to category pages which include relevant keywords. Optimize category URLs to be short and descriptive.
Use Tags Effectively
Tags provide more specific connections between related content across different categories. Use tags consistently to create meaningful content connections and help visitors discover related posts.
Create a tag strategy before you start tagging posts. Use 3-5 relevant tags per post. Avoid creating single-use tags as they provide little SEO value.
Focus on tags which connect content across multiple categories. This creates internal linking opportunities and helps search engines understand content relationships.
11. Configure permalink settings
A permalink is the web address used to link to your content. The URL to each post should be permanent and never change. The Settings Permalinks Screen allows you to choose your default permalink structure. You choose from common settings or create custom URL structures.
Log in to your WordPress dashboard. Navigate to Settings → Permalinks to access the permalink configuration page.
Permalink structure options are listed below.
- Plain. Uses simple numbers like ?p=123
- Day and name. Includes the date and post title like /2025/01/15/sample-post/
- Month and name. Includes month and post title like /2025/01/sample-post/
- Numeric – Uses post ID numbers like /archives/123
- Post name – Uses only the post title like /sample-post/ (recommended for SEO)
Select "Custom structure” if you want a more specific structure. Use the available tags to build your desired URL format:
- %post_id% – The unique ID number of the post
- %postname% – The post title (slug version)
- %category% – The category name
- %year% – The four-digit year
- %monthnum% – The month number
- %day% – The day of the month
Choose the "Post name" structure for the best SEO results. This creates clean, readable URLs which include your post titles. Search engines and users prefer descriptive URLs over numeric ones.
Avoid date-based permalinks unless you publish time-sensitive content like news articles. Date-based URLs make content appear outdated over time.
Keep permalinks short and descriptive. Remove unnecessary words like "the," "and," or "of" from your post titles when WordPress creates the permalink slug.
Save Your Changes
Click the "Save Changes" button at the bottom of the page to apply the new permalink settings after you select your preferred structure.
WordPress automatically updates all existing URLs when you change permalink settings. The system creates redirects from old URLs to new ones to prevent broken links.
12. Add posts and pages to your website
Content Genius by Search Atlas is an AI-driven platform for semantic SEO content creation and optimization. Content Genius delivers structured, information-dense content which aligns with how Google understands, ranks, and evaluates web pages.
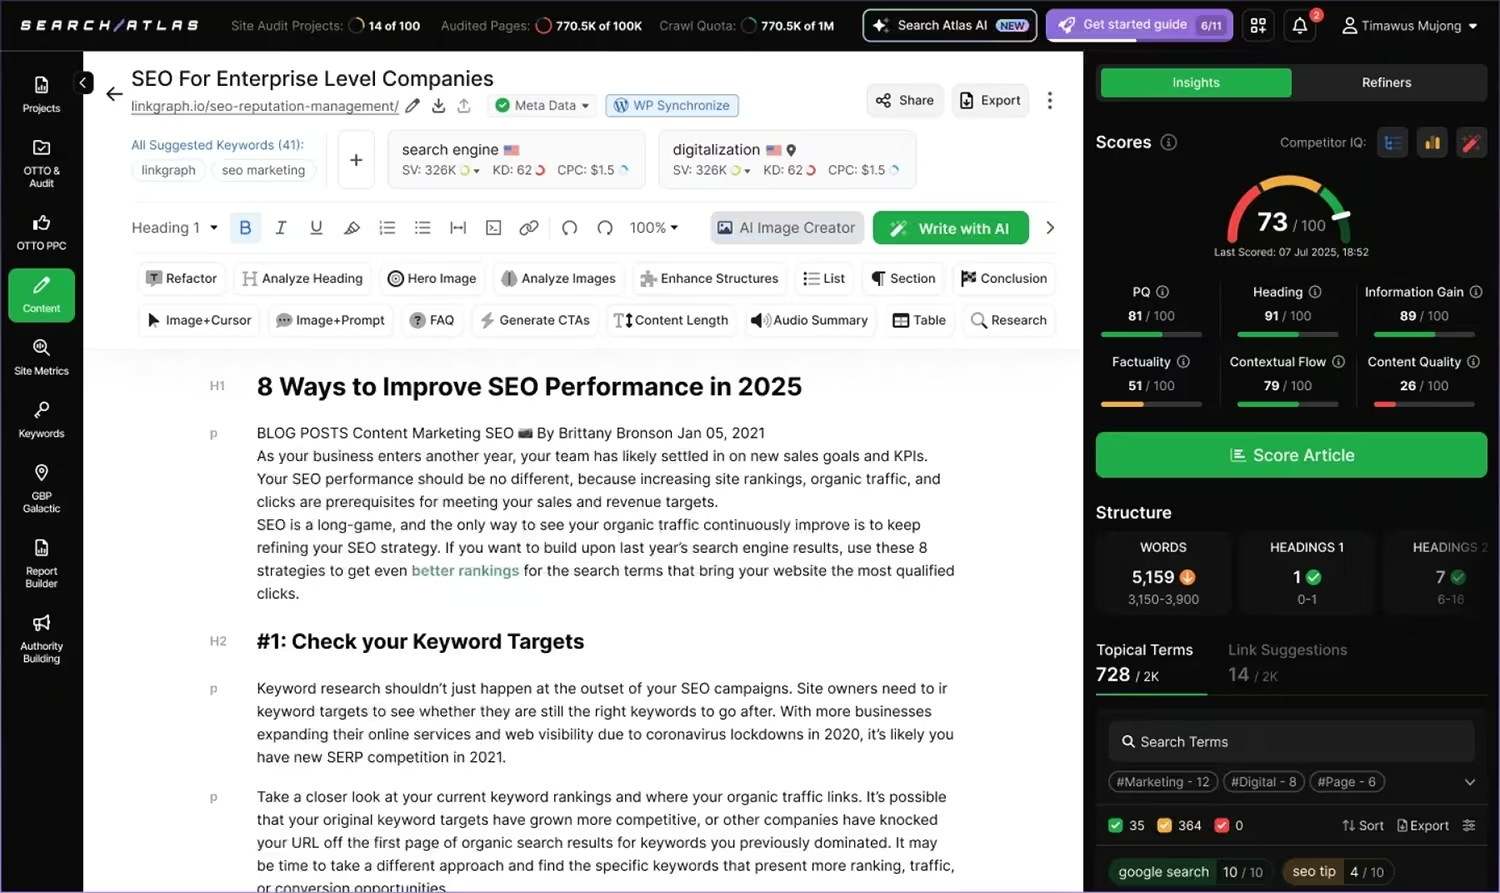
The system creates content as "passages" which mirror Google's indexing model. Each passage includes a heading plus text which answers an implied question. Specialized AI agents handle internal linking, factual accuracy, and brand voice adjustment.
Content Genius assesses content against semantic quality benchmarks similar to Google's algorithms. The system includes information retrieval, knowledge graph structuring, heading alignment, content brief generation, and synthesis with AI refinement.
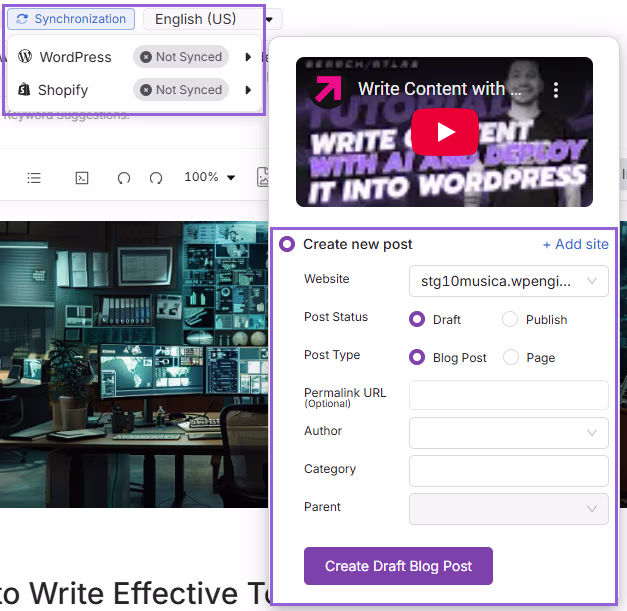
Content Genius includes one-click WordPress publishing which allows you to publish optimized content directly to your website. This eliminates manual copying and formatting while maintaining SEO optimization during publication.


